miércoles, 31 de julio de 2019

How to install spacewalk 2.9 on CentOS 7

Spacewalk is an open source Linux systems management solution.

Spacewalk's capabilities include:
- Inventory your systems (hardware and software information)
- Install and update software on your systems
- Collect and distribute your custom software packages into manageable groups
- Provision (kickstart) your systems
- Manage and deploy configuration files to your systems
- Provision virtual guests
- Start/stop/configure virtual guests
- Distribute content across multiple geographical sites in an efficient manner

Requirements:

- Outbound open ports 80, 443
- Inbound open ports 80, 443, 5222 (only if you want to push actions to client machines) and 5269 (only for push actions to a Spacewalk Proxy), 69 udp if you want to use tftp
- Storage for database: 250 KiB per client system + 500 KiB per channel + 230 KiB per package in channel (i.e. 1.1GiB for channel with 5000 packages)
- Storage for packages (default /var/satellite): Depends on what you're storing; Red Hat recommend 6GB per channel for their channels
- 2GB RAM minimum, 4GB recommended
- Make sure your underlying OS is fully up-to-date.

Project page:
https://spacewalkproject.github.io/

Spacewalk repositories:
https://copr-be.cloud.fedoraproject.org/results/%40spacewalkproject/spacewalk-2.9/epel-7-x86_64/

Last build #00912457

Github:
https://github.com/spacewalkproject/spacewalk

EPEL 7 repositories
yum -y install epel-release

Step 1:

Configure hosts file
# vi /etc/hosts
127.0.0.1   localhost localhost.localdomain localhost4 localhost4.localdomain4
::1         localhost localhost.localdomain localhost6 localhost6.localdomain6
10.71.34.86     spacewalk.ibtechpa.local spacewalk

Install spacewalk repositories
# rpm -Uvh https://copr-be.cloud.fedoraproject.org/results/@spacewalkproject/spacewalk-2.9/epel-7-x86_64/00912457-spacewalk-repo/spacewalk-repo-2.9-4.el7.noarch.rpm

Install EPEL repositories
# yum -y install epel-release

Configure locale to avoid perl warning. 
This can cause some issues when configuring spacewalk.
perl: warning: Setting locale failed.
perl: warning: Please check that your locale settings:
        LANGUAGE = (unset),
        LC_ALL = (unset),
        LANG = "C.UTF-8"
    are supported and installed on your system.
perl: warning: Falling back to the standard locale ("C").

Add these lines:
# vi /etc/environment
LC_ALL="en_US.UTF-8"
LC_CTYPE="en_US.UTF-8"
LANGUAGE="en_US.UTF-8"

Update and reboot the OS
# yum -y update
# reboot

Step 2:

Configure firewalld
# firewall-cmd --permanent --add-service=http
# firewall-cmd --permanent --add-service=https
# firewall-cmd --permanent --add-port=69/udp --add-port=5222/tcp --add-port=5269/tcp
# firewall-cmd --reload

Install spacewalk embebbed database
#  yum -y install spacewalk-setup-postgresql

Install spacewalk
# yum install -y spacewalk-postgresql

Step 3:

Configure spacewalk
[root@spacewalk ~]# spacewalk-setup
* Setting up SELinux..
** Database: Setting up database connection for PostgreSQL backend.
Database "rhnschema" does not exist
** Database: Installing the database:
** Database: This is a long process that is logged in:
** Database:   /var/log/rhn/install_db.log
*** Progress: #
** Database: Installation complete.
** Database: Populating database.
*** Progress: ############################
* Configuring tomcat.
* Setting up users and groups.
** GPG: Initializing GPG and importing key.
** GPG: Creating /root/.gnupg directory
You must enter an email address.
Admin Email Address? info@ibtechpa.com
* Performing initial configuration.
* Configuring apache SSL virtual host.
Should setup configure apache's default ssl server for you (saves original ssl.conf) [Y]? y
** /etc/httpd/conf.d/ssl.conf has been backed up to ssl.conf-swsave
* Configuring jabberd.
* Creating SSL certificates.
CA certificate password?
You must enter a password.
CA certificate password?
Re-enter CA certificate password?
Cname alias of the machine (comma seperated)? spacewalk
Organization? ibtechpa
Organization Unit [spacewalk.ibtechpa.local]?
Email Address [admin@ibtechpa.com]?
City?
City? Panama
State? Panama
Country code (Examples: "US", "JP", "IN", or type "?" to see a list)? PA
** SSL: Generating CA certificate.
** SSL: Deploying CA certificate.
** SSL: Generating server certificate.
** SSL: Storing SSL certificates.
* Deploying configuration files.
* Update configuration in database.
* Setting up Cobbler..
Cobbler requires tftp and xinetd services be turned on for PXE provisioning functionality. Enable these services [Y]?
* Restarting services.
Installation complete.
Visit https://spacewalk.ibtechpa.local to create the Spacewalk administrator account.
[root@spacewalk ~]#

Validate services its OK:
# spacewalk-service status

Step 4:

Open your browser and use IP address:
https://10.71.34.86

Domain name:
https://spacewalk.ibtechpa.local

Create administrator account and set your password:


You are ready to start managing spacewalk:


viernes, 24 de mayo de 2019

How to install Zimbra Collaboration Open Source 8.8.12_GA on CentOS 7

Requirements:
  • CentOS 7
  • 10 GB RAM
  • 5 GB Free Space on /opt/Zimbra
  • 10 GB free disk space on /opt
  • 10 GB free disk space on /tmp
  • Fully Qualified Domain Name (FQDN), in this demo is “mail.ibtechpa.local”
  • Record A & MX for your Server
  • The firewall should be disabled
Become the root user:

# sudo su -
or
# su -

Apply the latest updates using following command and then reboot:

# yum update -y
# reboot

Install Zimbra dependencies:
# yum install unzip net-tools sysstat libaio nmap-ncat libstdc++.so.6 openssh-clients perl-core wget libreoffice libreoffice-headless -y

Set the hostname of your server:

# hostnamectl set-hostname mail.ibtechpa.com
# exec bash

Edit hosts file:
# vi /etc/hosts

Add:

192.168.1.141 mail.ibtechpa.com mail

# cat /etc/hosts
127.0.0.1 localhost localhost.localdomain localhost4 localhost4.localdomain4
::1 localhost localhost.localdomain localhost6 localhost6.localdomain6
192.168.1.141 mail.ibtechpa.com mail

Zimbra recommends the firewall to be disabled:
# systemctl stop firewalld
# systemctl disable firewalld

In CentOS 7, postfix is installed and running by default. So, we need to disable it for Zimbra installation:
# systemctl stop postfix
# systemctl disable postfix

Create Zimbra directory to place the installer:

# mkdir /zimbra
# cd /zimbra

Download the Zimbra 8.8.12_GA:
# wget https://files.zimbra.com/downloads/8.8.12_GA/zcs-8.8.12_GA_3794.RHEL7_64.20190329045002.tgz

Extract the downloaded file:

# tar -zxvf zcs-8.8.12_GA_3794.RHEL7_64.20190329045002.tgz

Go to extracted folder and run the install script:
# cd zcs-8.8.12_GA_3794.RHEL7_64.20190329045002
[root@mail zcs-8.8.12_GA_3794.RHEL7_64.20190329045002]#
# ./install.sh

You will get text-based installation wizard. Press Y to accept the Zimbra license agreement:


Configure the Zimbra package repository:


Press "Y" to all Zimbra Components to install.

Pres "Y" to continue to download the Zimbra related packages. This task can take time depending upon on your internet speed.


Once all the Zimbra packages are download and installed, we will get the below window.
Enter the domain name for Zimbra installation.

In this case "ibtechpa.com"


Now we need to set the Zimbra admin password:
Press 7 and them 4.


Set Password, Press enter, and press "r" to return.


After set the admin password Press “s” and then Press enter to save the config in a file. Now Press “a” to apply the changes and enter “Y” to continue.


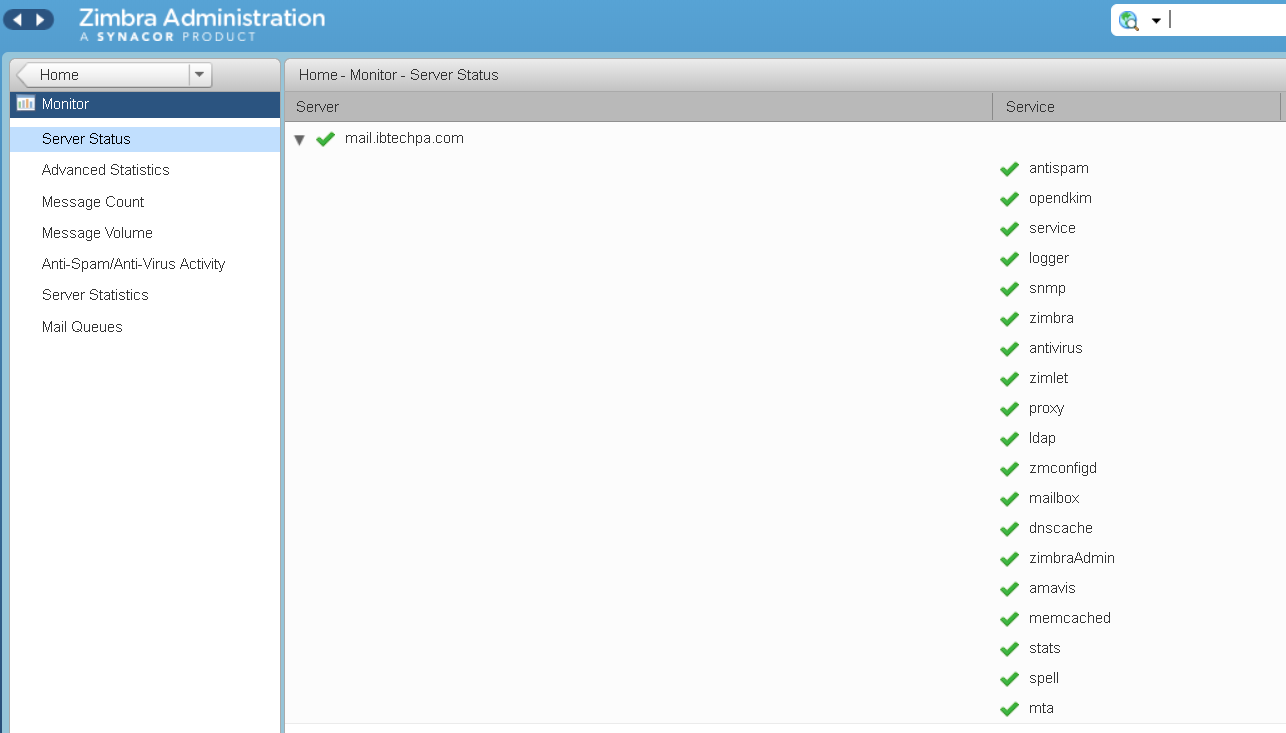
Logging in to cli and check services:

[root@mail ~]# su - zimbra
Last login: Fri May 24 17:10:48 EST 2019 on pts/0
[zimbra@mail ~]$

[zimbra@mail ~]$ zmcontrol status
Host mail.ibtechpa.com
        amavis                  Running
        antispam               Running
        antivirus               Running
        dnscache               Running
        ldap                      Running
        logger                   Running
        mailbox                Running
        memcached           Running
        mta                        Running
        opendkim               Running
        proxy                     Running
        service webapp     Running
        snmp                      Running
        spell                      Running
        stats                       Running
        zimbra webapp     Running
        zimbraAdmin webapp      Running
        zimlet webapp       Running
        zmconfigd              Running
[zimbra@mail ~]$

Check Version:

[zimbra@mail ~]$ zmcontrol -v
Release 8.8.12_GA_3794.RHEL7_64_20190329045002 RHEL7_64 FOSS edition, Patch 8.8.12_P1 proxy.
[zimbra@mail ~]$

Users -> URL – https://mail.ibtechpa.com
Admin URL – https://mail.ibtechpa.com:7071/


Test success!!!


miércoles, 12 de junio de 2013

ownCloud server install & basic configuration

First step:

[lbazan@ILBR001 ~]$ su
Contraseña:
[root@ILBR001 lbazan]# yum install owncloud


Second step:

Initialize apache:

[root@ILBR001 lbazan]#service httpd start
Redirecting to /bin/systemctl start  httpd.service

[root@ILBR001 lbazan]#

Third step:

when the installation finish go to your browser and write:

http://localhost/owncloud


When appear the owncloud home page you can write admin user and password. ownCloud don't have default user and password so you should think of one for that time. You can select the DB system for your election, in this case I use SQLite for a basic installation.

If you are user MySQL you need first create the database and then configure the user and password then put this configuration == in the ownCloud home page or you can edit the config file in "vi cd /etc/owncloud/config.php" directly. 

Ok! you finish the third step.

Now you have personal CLOUD


Screen Shots:

User Home Page

Expand configuration area

User admin area: You can create users and groups

Personal area: edit personal data and others

Aplication area: for install more addons

Administration area: some additional things for the good administration of the cloud
Links:
http://fedoraproject.org/wiki/Features/OwnCloud
http://owncloud.org/
http://doc.owncloud.org/
http://owncloud.org/features/

I hope you learn something this information. :-)

Regards!

jueves, 26 de julio de 2012

Nagios Notifications

To enable notifications the first step is edit contact email (example mail: test@gmail.com)

[root@BMNG001 soporte]# cd /etc/nagios/objects
[root@BMNG001 soporte]# vi contacts.cfg

1. Edit this lines:


define contact{
        contact_name  Soporte          ; Short name of user
        use           generic-contact  ; Inherit default values...
        alias         Soporte          ; Full name of user
        email         test@gmail.com   ; <<***** CHANGE THIS TO YOUR EMAIL ADDRESS ******
        }
 
2. And Then
 
edit hosts
 
vi /etc/hosts 
 
127.0.0.1   localhost localhost.localdomain localhost4 localhost4.localdomain4
::1         localhost localhost.localdomain localhost6 localhost6.localdomain6
192.168.160.6 BMNG001.ZEUS.loc BMNG001
 
Add your: IP - host.domain.com - HOSTNAME
[root@BMNG001 soporte]# service nagios restart


This is because I see that many have problems with notifications to 
the end and it is something simple but not everyone knows it.


Regards,
 

jueves, 19 de julio de 2012

Nagios in Fedora


Basic installation and configuration of Nagios on F17. Go into the console, login as root and proceed to write yum install nagios*

Install Nagios:

[soporte@BMNG001 ~]$ su                                                                                                                                      
Contraseña:
[root@BMNG001 soporte]# yum install nagios*

Start services Nagios and Apache:

[root@BMNG001 soporte]# services start nagios
[root@BMNG001 soporte]# services start httpd

Enable apache service:

[root@BMNG001 soporte]# chkconfig httpd on


Create nagios admin password:

[root@BMNG001 soporte]# htpasswd -c /etc/nagios/passwd nagiosadmin 

Check the configuration file:

[root@BMNG001 soporte]# vi /etc/httpd/conf.d/nagios.conf
  
Nagios user & groups 

[root@BMNG001 soporte]# groupadd nagios
[root@BMNG001 soporte]# adduser nagios -g nagios
[root@BMNG001 soporte]# passwd nagios
[root@BMNG001 soporte]# usermod -G nagios nagios
[root@BMNG001 soporte]# usermod -G apache,nagios apache

Verify the configuration:

[root@BMNG001 soporte]# nagios -v /etc/nagios/nagios.cfg
 
Nagios Core 3.4.1
Copyright (c) 2009-2011 Nagios Core Development Team and Community Contributors
Copyright (c) 1999-2009 Ethan Galstad
Last Modified: 05-11-2012
License: GPL

Website: http://www.nagios.org
Reading configuration data...
   Read main config file okay...
Processing object config file '/etc/nagios/objects/commands.cfg'...
Processing object config file '/etc/nagios/objects/contacts.cfg'...
Processing object config file '/etc/nagios/objects/timeperiods.cfg'...
Processing object config file '/etc/nagios/objects/templates.cfg'...
Processing object config file '/etc/nagios/objects/localhost.cfg'...
Processing object config file '/etc/nagios/objects/windows.cfg'...
   Read object config files okay...

Running pre-flight check on configuration data...

Checking services...
        Checked 61 services.
Checking hosts...
        Checked 8 hosts.
Checking host groups...
        Checked 2 host groups.
Checking service groups...
        Checked 0 service groups.
Checking contacts...
        Checked 1 contacts.
Checking contact groups...
        Checked 1 contact groups.
Checking service escalations...
        Checked 0 service escalations.
Checking service dependencies...
        Checked 0 service dependencies.
Checking host escalations...
        Checked 0 host escalations.
Checking host dependencies...
        Checked 0 host dependencies.
Checking commands...
        Checked 28 commands.
Checking time periods...
        Checked 5 time periods.
Checking for circular paths between hosts...
Checking for circular host and service dependencies...
Checking global event handlers...
Checking obsessive compulsive processor commands...
Checking misc settings...

Total Warnings: 0
Total Errors:   0

Things look okay - No serious problems were detected during the pre-flight check


Now type in your browser http://yourIP/nagios login with  your  nagiosadmin user already created.

Example:

http://192.168.160.6/nagios

Service Area


This is an example Nagios in Server my office:
Hosts Area


Coming soon: How to define hosts and groups. :-)

LAMP in Fedora 17

Many persons today have a question, What is LAMP? very simple for your acronym:

- Linux, the operating system, in some cases referred to LDAP.
- Apache, the web server;
- MySQL, the database manager;
- Perl, PHP, or Python programming languages​​.


Considering that I have Fedora 17 Xfce 64bit
the first step:

Install Apache server:

Go into the console, login as root and proceed to write: yum install httpd php php-common

[soporte@BMNG001 ~]$ su                                                                                                                                      
Contraseña:                                                                                                                                                  
[root@BMNG001 soporte]# yum install httpd php php-common


and then

[root@BMNG001 soporte]# service httpd start  
[root@BMNG001 soporte]# chkconfig --levels 235 httpd on

In your browser type http://yourIP/

Example:

http://192.168.160.6/


We will need some php modules:


[root@BMNG001 soporte]#  yum install php-pecl-apc php-cli php-pear php-pdo php-mysql php-pgsql php-pecl-mongo php-sqlite php-pecl-memcache php-pecl-memcached php-gd php-mbstring php-mcrypt php-xml
 
Install MySQL server:


[root@BMNG001 soporte]# yum install mysql mysql-server 

Start and enable services:

[root@BMNG001 soporte]# systemctl start mysqld.service
[root@BMNG001 soporte]# systemctl enable mysqld.service

Assign Mysql password:

[root@BMNG001 soporte]# mysqladmin -u root password Test2012$

Check connection to MySQL server:


[root@BMNG001 soporte]# mysql -h localhost -u root -p

And Finally install PHPMyAdmin:

[root@BMNG001 soporte]# yum install phpmyadmin

Restart Apache (httpd)

[root@BMNG001 soporte]# service httpd restart
Redirecting to /bin/systemctl restart  httpd.service
[root@BMNG001 soporte]#

when finish type in your browser: http://yourIP/phpmyadmin

Example:

http://192.168.160.6/phpmyadmin

And that's all, Greetings.

miércoles, 18 de julio de 2012

Nmap in Fedora 17


Use nmap for audits, vulnerability scanning, security test or others. :-)
The first step easy and simple: install. Go into the console, login as root and proceed to write yum install nmap.

[soporte@BMNG001 ~]$ su -
Contraseña:
[root@BMNG001~]# yum install nmap

Instalado:                                                                                                                      
  nmap.x86_64 2:6.00-1.fc17                                                                                                     
                                                                                                                                
¡Listo!                                                                                                                         
[root@BMNG001 ~]#

Now let's see the different modes of operation within our network, let's define some important commands remembering that some must be run as root.


Type (s) scanning

-sT system call connect () is used to connect to all ports. If the port is listening, connect () will succeed.

-sS not open a full TCP connection. It sends a SYN packet, if there comes a SYN | ACK is sent to close the connection RTS.

-sP If you only need to know which nodes are active. In root mode techniques used ICMP, SYN ACK and parallel to detect that node is active.

-sU Used to know that UDP ports are open. In UNIX nodes UDP scanning is limited in frequency.

-sF -sX -sN Stealth Mode FIN, Xmas Tree, or Null scan. The idea is that closed ports respond to RST packets, while open ports must ignore the packets in question. Because this type of scan nodes will not work on Windows, is a good idea to distinguish between platforms.


General Options 
-PT <#port> Use TCP ping to determine which servers are active.

Resolves DNS-R all nodes. 

- dns-servers <server1[,server2],...> Alternatively, you can specify which DNS servers search for names 
-O Report Operating System 
-p port scan 25,80,1000-4000 only 25.80 and 1000 to 4000 
-sV check the versions of software that listens on ports 
-v enable extended information mode (supports more than one v)

Objects specification

nmap -sS -P0 -sV -O 192.168.160.1 performs a deep scan of the node.

nmap -sT -n -p --P0 192.168.160.6 discussing with TCP scan all 65535 ports, without sending ping consent (which may be blocked by the table) and without reverse DNS lookup, this makes the scan is very fast.

nmap -T5 -F -O -iL input.txt done very fast scanning of the nodes listed (one per line) in input.txt used primarily to detect the OS

nmap -sV -n -P0 -p 22 192.168.160.6 detect that service runs on port 22 192.168.160.6 node and its version.

nmap -sL 192.168.160.1-255 looking through DNS host in the range 192.168.160.1-255 with name and registered in the DNS. Usually the nodes that are not in the DNS appear in this scan as not connected.

nmap -sP -PR live 192.168.160.1-255 looking hosts through ARP pings (-PR) in the range 192.168.160.1-255, arp pings is chosen because it might ICMP pings are blocked by a firewall.

nmap - iflist prints the list of interface and default route for each interface.

host -l servertest.com | cut -d " " -f  4 | ./nmap -v -iL - makes a DNS zone transfer to find servidor.com servers and then move IP addresses to nmap.


These commands can see, writing on the console $nmap.


[soporte@BMNG001 ~]$ nmap                                                                                                       
Nmap 6.00 ( http://nmap.org )                                                                                                   
Usage: nmap [Scan Type(s)] [Options] {target specification}                                                                     
 

TARGET SPECIFICATION:                                                                                                           
  Can pass hostnames, IP addresses, networks, etc.                                                                              
  Ex: scanme.nmap.org, microsoft.com/24, 192.168.0.1; 10.0.0-255.1-254                                                          
  -iL <inputfilename>: Input from list of hosts/networks                                                                        
  -iR <num hosts>: Choose random targets                                                                                        
  --exclude <host1[,host2][,host3],...>: Exclude hosts/networks                                                                 
  --excludefile <exclude_file>: Exclude list from file                                                                          
 

HOST DISCOVERY:                                                                                                                 
  -sL: List Scan - simply list targets to scan                                                                                  
  -sn: Ping Scan - disable port scan                                                                                            
  -Pn: Treat all hosts as online -- skip host discovery                                                                         
  -PS/PA/PU/PY[portlist]: TCP SYN/ACK, UDP or SCTP discovery to given ports                                                     
  -PE/PP/PM: ICMP echo, timestamp, and netmask request discovery probes                                                         
  -PO[protocol list]: IP Protocol Ping                                                                                          
  -n/-R: Never do DNS resolution/Always resolve [default: sometimes]                                                            
  --dns-servers <serv1[,serv2],...>: Specify custom DNS servers                                                                 
  --system-dns: Use OS's DNS resolver                                                                                           
  --traceroute: Trace hop path to each host                                                                                     
 

SCAN TECHNIQUES:                                                                                                                
  -sS/sT/sA/sW/sM: TCP SYN/Connect()/ACK/Window/Maimon scans                                                                    
  -sU: UDP Scan                                                                                                                 
  -sN/sF/sX: TCP Null, FIN, and Xmas scans                                                                                      
  --scanflags <flags>: Customize TCP scan flags                                                                                 
  -sI <zombie host[:probeport]>: Idle scan                                                                                      
  -sY/sZ: SCTP INIT/COOKIE-ECHO scans                                                                                           
  -sO: IP protocol scan                                                                                                         
  -b <FTP relay host>: FTP bounce scan                                                                                          
 

PORT SPECIFICATION AND SCAN ORDER:                                                                                              
  -p <port ranges>: Only scan specified ports                                                                                   
    Ex: -p22; -p1-65535; -p U:53,111,137,T:21-25,80,139,8080,S:9                                                                
  -F: Fast mode - Scan fewer ports than the default scan                                                                        
  -r: Scan ports consecutively - don't randomize                                                                                
  --top-ports <number>: Scan <number> most common ports                                                                         
  --port-ratio <ratio>: Scan ports more common than <ratio>                                                                     
 

SERVICE/VERSION DETECTION:                                                                                                      
  -sV: Probe open ports to determine service/version info                                                                       
  --version-intensity <level>: Set from 0 (light) to 9 (try all probes)                                                         
  --version-light: Limit to most likely probes (intensity 2)                                                                    
  --version-all: Try every single probe (intensity 9)                                                                           
  --version-trace: Show detailed version scan activity (for debugging)                                                          
 

SCRIPT SCAN:                                                                                                                    
  -sC: equivalent to --script=default                                                                                           
  --script=<Lua scripts>: <Lua scripts> is a comma separated list of                                                            
           directories, script-files or script-categories                                                                       
  --script-args=<n1=v1,[n2=v2,...]>: provide arguments to scripts                                                               
  --script-args-file=filename: provide NSE script args in a file                                                                
  --script-trace: Show all data sent and received                                                                               
  --script-updatedb: Update the script database.                                                                                
  --script-help=<Lua scripts>: Show help about scripts.                                                                         
           <Lua scripts> is a comma separted list of script-files or                                                            
           script-categories.                                                                                                   
 

OS DETECTION:                                                                                                                   
  -O: Enable OS detection                                                                                                       
  --osscan-limit: Limit OS detection to promising targets                                                                       
  --osscan-guess: Guess OS more aggressively                                                                                    
 

TIMING AND PERFORMANCE:                                                                                                         
  Options which take <time> are in seconds, or append 'ms' (milliseconds),                                                      
  's' (seconds), 'm' (minutes), or 'h' (hours) to the value (e.g. 30m).                                                         
  -T<0-5>: Set timing template (higher is faster)                                                                               
  --min-hostgroup/max-hostgroup <size>: Parallel host scan group sizes                                                          
  --min-parallelism/max-parallelism <numprobes>: Probe parallelization                                                          
  --min-rtt-timeout/max-rtt-timeout/initial-rtt-timeout <time>: Specifies                                                       
      probe round trip time.                                                                                                    
  --max-retries <tries>: Caps number of port scan probe retransmissions.                                                        
  --host-timeout <time>: Give up on target after this long                                                                      
  --scan-delay/--max-scan-delay <time>: Adjust delay between probes                                                             
  --min-rate <number>: Send packets no slower than <number> per second                                                          
  --max-rate <number>: Send packets no faster than <number> per second                                                           

FIREWALL/IDS EVASION AND SPOOFING:                                                                                              
  -f; --mtu <val>: fragment packets (optionally w/given MTU)                                                                    
  -D <decoy1,decoy2[,ME],...>: Cloak a scan with decoys                                                                         
  -S <IP_Address>: Spoof source address                                                                                         
  -e <iface>: Use specified interface                                                                                           
  -g/--source-port <portnum>: Use given port number                                                                             
  --data-length <num>: Append random data to sent packets                                                                       
  --ip-options <options>: Send packets with specified ip options                                                                
  --ttl <val>: Set IP time-to-live field                                                                                        
  --spoof-mac <mac address/prefix/vendor name>: Spoof your MAC address                                                          
  --badsum: Send packets with a bogus TCP/UDP/SCTP checksum                                                                     
 

OUTPUT:                                                                                                                         
  -oN/-oX/-oS/-oG <file>: Output scan in normal, XML, s|<rIpt kIddi3,                                                           
     and Grepable format, respectively, to the given filename.                                                                  
  -oA <basename>: Output in the three major formats at once                                                                     
  -v: Increase verbosity level (use -vv or more for greater effect)                                                             
  -d: Increase debugging level (use -dd or more for greater effect)                                                             
  --reason: Display the reason a port is in a particular state                                                                  
  --open: Only show open (or possibly open) ports                                                                               
  --packet-trace: Show all packets sent and received                                                                            
  --iflist: Print host interfaces and routes (for debugging)                                                                    
  --log-errors: Log errors/warnings to the normal-format output file                                                            
  --append-output: Append to rather than clobber specified output files                                                         
  --resume <filename>: Resume an aborted scan                                                                                   
  --stylesheet <path/URL>: XSL stylesheet to transform XML output to HTML                                                       
  --webxml: Reference stylesheet from Nmap.Org for more portable XML                                                            
  --no-stylesheet: Prevent associating of XSL stylesheet w/XML output                                                           
 

MISC:                                                                                                                           
  -6: Enable IPv6 scanning                                                                                                      
  -A: Enable OS detection, version detection, script scanning, and traceroute                                                   
  --datadir <dirname>: Specify custom Nmap data file location                                                                   
  --send-eth/--send-ip: Send using raw ethernet frames or IP packets                                                            
  --privileged: Assume that the user is fully privileged                                                                        
  --unprivileged: Assume the user lacks raw socket privileges                                                                   
  -V: Print version number                                                                                                      
  -h: Print this help summary page.                                                                                             
 

EXAMPLES:                                                                                                                       
  nmap -v -A scanme.nmap.org                                                                                                    
  nmap -v -sn 192.168.0.0/16 10.0.0.0/8                                                                                         
  nmap -v -iR 10000 -Pn -p 80


And this is advanced example and simple, some things like this X as mac address for "security" reasons.


[root@BMNG001 soporte]# nmap -sS -P0 -sV -O 192.168.160.1                                                                       
                                                                                                                                
Starting Nmap 6.00 ( http://nmap.org ) at 2012-07-18 16:05   EST                                                                   
Nmap scan report for 192.168.160.1                                                                                                
Host is up (0.00045s latency).                                                                                                  
Not shown: 997 filtered ports                                                                                                   
PORT    STATE  SERVICE      VERSION                                                                                             
264/tcp open   fw1-topology Checkpoint FW1 Topology                                                                             
443/tcp open   ssl/http     Check Point SVN foundation httpd                                                                    
500/tcp closed isakmp                                                                                                           
MAC Address: X:X:X:X:X:X (Lanner Electronics)                                                                             
Device type: firewall|specialized|general purpose|broadband router|WAP                                                          
Running (JUST GUESSING): Check Point Linux 2.6.X|2.4.X (97%), Cisco embedded (91%), Linux 2.6.X|2.4.X (89%), ZyXEL ZyNOS 2.X (88%
), Juniper IVE OS 7.X (88%), Endian Linux 2.6.X (87%), IPCop Linux 2.4.X (87%)                                                  
OS CPE: cpe:/o:checkpoint:linux:2.6 cpe:/o:checkpoint:linux:2.4 cpe:/o:linux:kernel:2.6.30 cpe:/o:zyxel:zynos:2 cpe:/o:linux:kern
el:2.4 cpe:/o:juniper:ive_os:7 cpe:/o:endian:linux:2.6 cpe:/o:ipcop:linux:2.4                                                   
Aggressive OS guesses: Check Point VPN-1 firewall (Linux 2.6.18) (97%), Check Point firewall (Linux 2.4.21) (93%), Cisco NME-NAM-
80S network analysis module (91%), Linux 2.6.30 (89%), Linux 2.6.24 (Gentoo) (89%), ZyXEL ZyWALL USG 50 firewall (ZyNOS 2.21) (88
%), Linux 2.6.24 (88%), OpenWrt Kamikaze 8.09.1 (Linux 2.4.35.4) (88%), OpenWrt (Linux 2.4.32) (88%), Juniper SA4000 SSL VPN gate
way (IVE OS 7.0) (88%)                                                                                                          
No exact OS matches for host (test conditions non-ideal).                                                                       
Network Distance: 1 hop                                                                                                         
Service Info: Device: firewall                                                                                                  
                                                                                                                                
OS and Service detection performed. Please report any incorrect results at http://nmap.org/submit/ .                            
Nmap done: 1 IP address (1 host up) scanned in 21.13 seconds

I hope this material serve in their daily work.