jueves, 22 de junio de 2023

Unifi - Enable ICMP Request/Reply - WAN.

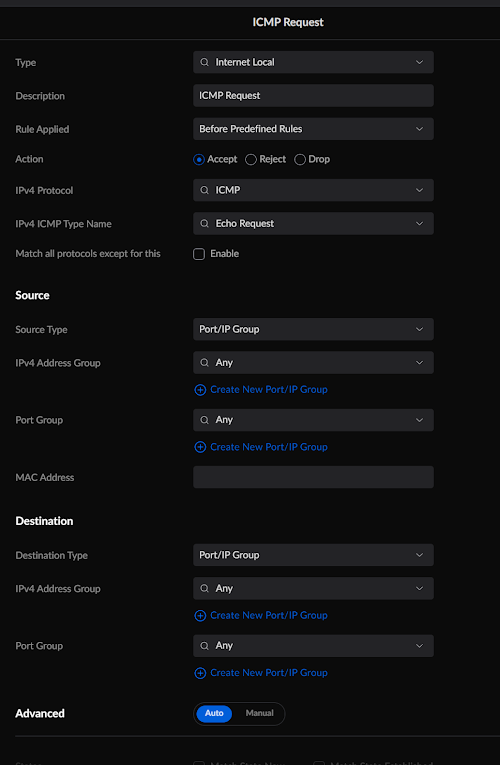
ICMP Request

Type: Internet Local
Description ICMP Request
Rule Applied: Before Predefined Rules
Action: Accept
IPv4 Protocol: ICMP
IPv4 ICMP Type Name: Echo Request

Source
Source Type: Port/IP Group
IPv4 Address Group: Any
Port Group: Any

Destination
Destination Type: Port/IP Group
IPv4 Address Group: Any
Port Group: Any


ICMP Reply

Type: Internet Local
Description ICMP Reply
Rule Applied: Before Predefined Rules
Action: Accept
IPv4 Protocol: ICMP
IPv4 ICMP Type Name: Echo Reply

Source
Source Type: Port/IP Group
IPv4 Address Group: Any
Port Group: Any

Destination
Destination Type: Port/IP Group
IPv4 Address Group: Any
Port Group: Any


viernes, 4 de marzo de 2022

Configure Network Teaming on Linux

# nmcli con show
NAME                  UUID                                  TYPE      DEVICE
ens3f1                ad4de530-d769-41da-8106-492aa6935249  ethernet  ens3f1
eno1np0               fdc36552-aa7f-4c55-b4d6-dabcf3c290b6  ethernet  --
eno2np1               de2f6e48-7eb7-405b-9723-5chabad0d3b5  ethernet  --
ens1f0np0             6cad5f98-2816-4cc9-bf93-98241e08b483  ethernet  --
ens1f1np1             47224338-e98a-4051-b249-eeab9ff73d4a  ethernet  --
ens3f0                702fa45f-fe83-43e3-8f2e-738d1e54d0b2  ethernet  --

Create the team interface (team0)
#nmcli con add type team con-name team0

Create the team slave and add in the group team0 as a master.
# nmcli con add type team-slave ifname ens1f0np0 master team0
# nmcli con add type team-slave ifname ens1f1np1 master team0

# nmcli con show (To validate the team slave)
team-slave-ens1f0np0  d4938d49-a828-4c11-810b-59ae893f06f8  ethernet  ens1f0np0
team-slave-ens1f1np1  8907f12b-1c16-4146-8f02-3724e9d89224  ethernet  ens1f1np1

Add IpAddress
# nmcli con mod team0 ipv4.addresses 192.168.1.100/22

Configure Gateway
# nmcli con mod team0 ipv4.gateway 192.168.1.1

Configure DNS
# nmcli con mod team0 ipv4.dns 8.8.8.8
# nmcli con mod team0 ipv4.dns 8.8.2.2

Configure Manual mode
# nmcli con mod team0 ipv4.method manual

Configure autoconnect at startup
# nmcli con mod team0 connection.autoconnect yes

Restart the team0 (network service)
# nmcli connection down team0 && nmcli connection up team0

Check the status of your new interface.
# teamdctl nm-team state
setup:
  runner: roundrobin
ports:
  ens1f0np0
    link watches:
      link summary: up
      instance[link_watch_0]:
        name: ethtool
        link: up
        down count: 1
  ens1f1np1
    link watches:
      link summary: up
      instance[link_watch_0]:
        name: ethtool
        link: up
        down count: 1

Available team modes
round-robin – data is transmitted over all ports in turn (default mode)
loadbalance – With active Tx load balancing and BPF-based Tx port selectors
lacp – implements the 802.3ad Link Aggregation Control Protocol
broadcast – data is transmitted over all ports
active-backup – one port or link is used while others are kept as a backup

viernes, 12 de noviembre de 2021

Zabbix 5.4 - MariaDB - Centos 8

Update Server Centos 8.
# dnf update -y
# reboot

Install zabbix repository
# rpm -Uvh https://repo.zabbix.com/zabbix/5.4/rhel/8/x86_64/zabbix-release-5.4-1.el8.noarch.rpm
# dnf clean all

Install DB MariaDB and enable / start service.
# dnf -y install mariadb-server
# systemctl start mariadb
# systemctl enable mariadb

Reset root password for database
# mysql_secure_installation
NOTE: RUNNING ALL PARTS OF THIS SCRIPT IS RECOMMENDED FOR ALL MariaDB
      SERVERS IN PRODUCTION USE!  PLEASE READ EACH STEP CAREFULLY!
In order to log into MariaDB to secure it, we'll need the current
password for the root user.  If you've just installed MariaDB, and
you haven't set the root password yet, the password will be blank,
so you should just press enter here.
Enter current password for root (enter for none):
OK, successfully used password, moving on...
Setting the root password ensures that nobody can log into the MariaDB
root user without the proper authorisation.
Set root password? [Y/n] Y
New password:
Re-enter new password:
Password updated successfully!
Reloading privilege tables..
 ... Success!

By default, a MariaDB installation has an anonymous user, allowing anyone
to log into MariaDB without having to have a user account created for
them.  This is intended only for testing, and to make the installation
go a bit smoother.  You should remove them before moving into a
production environment.
Remove anonymous users? [Y/n] Y
 ... Success!
Normally, root should only be allowed to connect from 'localhost'.  This
ensures that someone cannot guess at the root password from the network.
Disallow root login remotely? [Y/n] Y
 ... Success!
By default, MariaDB comes with a database named 'test' that anyone can
access.  This is also intended only for testing, and should be removed
before moving into a production environment.
Remove test database and access to it? [Y/n] Y
 - Dropping test database...
 ... Success!
 - Removing privileges on test database...
 ... Success!
Reloading the privilege tables will ensure that all changes made so far
will take effect immediately.
Reload privilege tables now? [Y/n] Y
 ... Success!
Cleaning up...
All done!  If you've completed all of the above steps, your MariaDB
installation should now be secure.
Thanks for using MariaDB!

Create Database. 
# mysql -uroot -p'yourpassword123$' -e "create database zabbix character set utf8 collate utf8_bin;"
# mysql -uroot -p'yourpassword123$' -e "grant all privileges on zabbix.* to zabbix@localhost identified by 'yourpassword123$';"

Check Database.
# mysql -u root -p
Enter password:
Welcome to the MariaDB monitor.  Commands end with ; or \g.
Your MariaDB connection id is 18
Server version: 10.3.28-MariaDB MariaDB Server
Copyright (c) 2000, 2018, Oracle, MariaDB Corporation Ab and others.
Type 'help;' or '\h' for help. Type '\c' to clear the current input statement.
MariaDB [(none)]> show databases;
+--------------------+
| Database           |
+--------------------+
| information_schema |
| mysql              |
| performance_schema |
| zabbix             |
+--------------------+
4 rows in set (0.001 sec)
MariaDB [(none)]>

Disable strict Mode temporary
# mysql -uroot -p'yourpassword123$' zabbix -e "set global innodb_strict_mode='OFF';"

Import Database.
# zcat /usr/share/doc/zabbix-sql-scripts/mysql/create.sql.gz | mysql -uzabbix -p'yourpassword123$' zabbix

Enable strict mode
# mysql -uroot -p'yourpassword123$' zabbix -e "set global innodb_strict_mode='ON';"

Restart zabbix and Enable the service.
# systemctl restart zabbix-server zabbix-agent
# systemctl enable zabbix-server zabbix-agent

Start and enable Apache
# systemctl restart httpd
# systemctl enable httpd

Start and enable php-fpm
# systemctl restart php-fpm
# systemctl enable php-fpm

Enter to the url and start the setup.

http://ip-address/zabbix
In the wizard you only need put the DB password yourpassword123$

Set your timezone.
and finish your setup.
Dashboard view - theme dark <- I like this dashboard xD

Default user and password Admin / zabbix
http://ip-address/zabbix/zabbix.php?action=dashboard.view

Redirect the welcome page of apache
Create file: 
# vim /var/www/html/index.html

add this lines only change your ip
<!DOCTYPE html>
<html>
   <head>
      <title>Redirecting</title>
      <meta http-equiv="refresh" content="0; URL='http://youriporyourdomain/zabbix'" />
   </head>
</html>


lunes, 21 de junio de 2021

MariaDB 5.5.68 Upgrade to 10.4

First step BACKUP.
# mysqldump -u root -p --all-databases --routines --triggers > /tmp/all-databases.sql
# cp /etc/my.cnf /etc/my.cnf.orig

Validate version:
# mysql -V

Update and reboot...
# yum update -y
# reboot

Stop services: 
# systemctl stop mariadb

Remove mariadb-server / mariadb.
# yum remove mariadb mariadb-server

Install nano editor but you can use vi / vim / etc....

# yum install nano epel-release

Create or edit the repo file.
# nano /etc/yum.repos.d/mariadb.repo

[mariadb]
name = MariaDB
baseurl = http://yum.mariadb.org/10.4/centos7-amd64
gpgkey=https://yum.mariadb.org/RPM-GPG-KEY-MariaDB
gpgcheck=1

Clean repos...
# yum clean all

Install MariaDB / Client 10.4
# yum install MariaDB-server MariaDB-client net-snmp perl-DB-MySQL -y

Restore my.cnf (if required ... sometimes it is not ...)
# rm -rf /etc/my.cnf
# cp /etc/my.cnf.orig /etc/my.cnf

Enable services:
# systemctl enable mariadb
# systemctl start mariadb

Upgrade databases:
# mysql_upgrade

If you receive this error:
ERROR 1045 (28000): Access denied for user 'root'@'localhost' (using password: YES)

# mysql_ugprade --password

Validate version:
# mysql -V

jueves, 25 de febrero de 2021

ZimbraLogHostname is not configured - error

[root@mail ~]# cat /etc/centos-release

CentOS Stream release 8

[zimbra@mail ~]$ zmcontrol -v

Release 8.8.15_GA_3953.RHEL8_64_20200629025823 UNKNOWN_64 FOSS edition, Patch 8.8.15_P19.

Log in as the zimbra user

[root@mail ~]# su - zimbra

[zimbra@mail ~]$

Now run this command to set the hostname in the Logs configuration.

Remember to change the domain name to yours.

[zimbra@mail ~]$ zmprov mcf zimbraLogHostname mail.ibtechpa.com

[zimbra@mail ~]$ exit

logout

Switch to root user.

[root@mail ~]#

Update the log configuration with this command.

[root@mail ~]# /opt/zimbra/libexec/zmsyslogsetup

updateSyslogNG: Updating /etc/syslog-ng/syslog-ng.conf...done.

Last step restart zimbra services


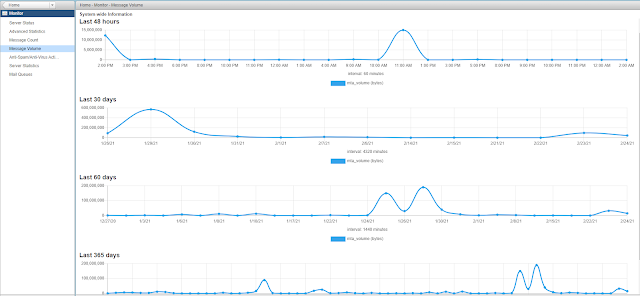
With this you can see all your statistics and logs from the administrator gui.


miércoles, 31 de julio de 2019

How to install spacewalk 2.9 on CentOS 7

Spacewalk is an open source Linux systems management solution.

Spacewalk's capabilities include:
- Inventory your systems (hardware and software information)
- Install and update software on your systems
- Collect and distribute your custom software packages into manageable groups
- Provision (kickstart) your systems
- Manage and deploy configuration files to your systems
- Provision virtual guests
- Start/stop/configure virtual guests
- Distribute content across multiple geographical sites in an efficient manner

Requirements:

- Outbound open ports 80, 443
- Inbound open ports 80, 443, 5222 (only if you want to push actions to client machines) and 5269 (only for push actions to a Spacewalk Proxy), 69 udp if you want to use tftp
- Storage for database: 250 KiB per client system + 500 KiB per channel + 230 KiB per package in channel (i.e. 1.1GiB for channel with 5000 packages)
- Storage for packages (default /var/satellite): Depends on what you're storing; Red Hat recommend 6GB per channel for their channels
- 2GB RAM minimum, 4GB recommended
- Make sure your underlying OS is fully up-to-date.

Project page:
https://spacewalkproject.github.io/

Spacewalk repositories:
https://copr-be.cloud.fedoraproject.org/results/%40spacewalkproject/spacewalk-2.9/epel-7-x86_64/

Last build #00912457

Github:
https://github.com/spacewalkproject/spacewalk

EPEL 7 repositories
yum -y install epel-release

Step 1:

Configure hosts file
# vi /etc/hosts
127.0.0.1   localhost localhost.localdomain localhost4 localhost4.localdomain4
::1         localhost localhost.localdomain localhost6 localhost6.localdomain6
10.71.34.86     spacewalk.ibtechpa.local spacewalk

Install spacewalk repositories
# rpm -Uvh https://copr-be.cloud.fedoraproject.org/results/@spacewalkproject/spacewalk-2.9/epel-7-x86_64/00912457-spacewalk-repo/spacewalk-repo-2.9-4.el7.noarch.rpm

Install EPEL repositories
# yum -y install epel-release

Configure locale to avoid perl warning. 
This can cause some issues when configuring spacewalk.
perl: warning: Setting locale failed.
perl: warning: Please check that your locale settings:
        LANGUAGE = (unset),
        LC_ALL = (unset),
        LANG = "C.UTF-8"
    are supported and installed on your system.
perl: warning: Falling back to the standard locale ("C").

Add these lines:
# vi /etc/environment
LC_ALL="en_US.UTF-8"
LC_CTYPE="en_US.UTF-8"
LANGUAGE="en_US.UTF-8"

Update and reboot the OS
# yum -y update
# reboot

Step 2:

Configure firewalld
# firewall-cmd --permanent --add-service=http
# firewall-cmd --permanent --add-service=https
# firewall-cmd --permanent --add-port=69/udp --add-port=5222/tcp --add-port=5269/tcp
# firewall-cmd --reload

Install spacewalk embebbed database
#  yum -y install spacewalk-setup-postgresql

Install spacewalk
# yum install -y spacewalk-postgresql

Step 3:

Configure spacewalk
[root@spacewalk ~]# spacewalk-setup
* Setting up SELinux..
** Database: Setting up database connection for PostgreSQL backend.
Database "rhnschema" does not exist
** Database: Installing the database:
** Database: This is a long process that is logged in:
** Database:   /var/log/rhn/install_db.log
*** Progress: #
** Database: Installation complete.
** Database: Populating database.
*** Progress: ############################
* Configuring tomcat.
* Setting up users and groups.
** GPG: Initializing GPG and importing key.
** GPG: Creating /root/.gnupg directory
You must enter an email address.
Admin Email Address? info@ibtechpa.com
* Performing initial configuration.
* Configuring apache SSL virtual host.
Should setup configure apache's default ssl server for you (saves original ssl.conf) [Y]? y
** /etc/httpd/conf.d/ssl.conf has been backed up to ssl.conf-swsave
* Configuring jabberd.
* Creating SSL certificates.
CA certificate password?
You must enter a password.
CA certificate password?
Re-enter CA certificate password?
Cname alias of the machine (comma seperated)? spacewalk
Organization? ibtechpa
Organization Unit [spacewalk.ibtechpa.local]?
Email Address [admin@ibtechpa.com]?
City?
City? Panama
State? Panama
Country code (Examples: "US", "JP", "IN", or type "?" to see a list)? PA
** SSL: Generating CA certificate.
** SSL: Deploying CA certificate.
** SSL: Generating server certificate.
** SSL: Storing SSL certificates.
* Deploying configuration files.
* Update configuration in database.
* Setting up Cobbler..
Cobbler requires tftp and xinetd services be turned on for PXE provisioning functionality. Enable these services [Y]?
* Restarting services.
Installation complete.
Visit https://spacewalk.ibtechpa.local to create the Spacewalk administrator account.
[root@spacewalk ~]#

Validate services its OK:
# spacewalk-service status

Step 4:

Open your browser and use IP address:
https://10.71.34.86

Domain name:
https://spacewalk.ibtechpa.local

Create administrator account and set your password:


You are ready to start managing spacewalk:


viernes, 24 de mayo de 2019

How to install Zimbra Collaboration Open Source 8.8.12_GA on CentOS 7

Requirements:
  • CentOS 7
  • 10 GB RAM
  • 5 GB Free Space on /opt/Zimbra
  • 10 GB free disk space on /opt
  • 10 GB free disk space on /tmp
  • Fully Qualified Domain Name (FQDN), in this demo is “mail.ibtechpa.local”
  • Record A & MX for your Server
  • The firewall should be disabled
Become the root user:

# sudo su -
or
# su -

Apply the latest updates using following command and then reboot:

# yum update -y
# reboot

Install Zimbra dependencies:
# yum install unzip net-tools sysstat libaio nmap-ncat libstdc++.so.6 openssh-clients perl-core wget libreoffice libreoffice-headless -y

Set the hostname of your server:

# hostnamectl set-hostname mail.ibtechpa.com
# exec bash

Edit hosts file:
# vi /etc/hosts

Add:

192.168.1.141 mail.ibtechpa.com mail

# cat /etc/hosts
127.0.0.1 localhost localhost.localdomain localhost4 localhost4.localdomain4
::1 localhost localhost.localdomain localhost6 localhost6.localdomain6
192.168.1.141 mail.ibtechpa.com mail

Zimbra recommends the firewall to be disabled:
# systemctl stop firewalld
# systemctl disable firewalld

In CentOS 7, postfix is installed and running by default. So, we need to disable it for Zimbra installation:
# systemctl stop postfix
# systemctl disable postfix

Create Zimbra directory to place the installer:

# mkdir /zimbra
# cd /zimbra

Download the Zimbra 8.8.12_GA:
# wget https://files.zimbra.com/downloads/8.8.12_GA/zcs-8.8.12_GA_3794.RHEL7_64.20190329045002.tgz

Extract the downloaded file:

# tar -zxvf zcs-8.8.12_GA_3794.RHEL7_64.20190329045002.tgz

Go to extracted folder and run the install script:
# cd zcs-8.8.12_GA_3794.RHEL7_64.20190329045002
[root@mail zcs-8.8.12_GA_3794.RHEL7_64.20190329045002]#
# ./install.sh

You will get text-based installation wizard. Press Y to accept the Zimbra license agreement:


Configure the Zimbra package repository:


Press "Y" to all Zimbra Components to install.

Pres "Y" to continue to download the Zimbra related packages. This task can take time depending upon on your internet speed.


Once all the Zimbra packages are download and installed, we will get the below window.
Enter the domain name for Zimbra installation.

In this case "ibtechpa.com"


Now we need to set the Zimbra admin password:
Press 7 and them 4.


Set Password, Press enter, and press "r" to return.


After set the admin password Press “s” and then Press enter to save the config in a file. Now Press “a” to apply the changes and enter “Y” to continue.


Logging in to cli and check services:

[root@mail ~]# su - zimbra
Last login: Fri May 24 17:10:48 EST 2019 on pts/0
[zimbra@mail ~]$

[zimbra@mail ~]$ zmcontrol status
Host mail.ibtechpa.com
        amavis                  Running
        antispam               Running
        antivirus               Running
        dnscache               Running
        ldap                      Running
        logger                   Running
        mailbox                Running
        memcached           Running
        mta                        Running
        opendkim               Running
        proxy                     Running
        service webapp     Running
        snmp                      Running
        spell                      Running
        stats                       Running
        zimbra webapp     Running
        zimbraAdmin webapp      Running
        zimlet webapp       Running
        zmconfigd              Running
[zimbra@mail ~]$

Check Version:

[zimbra@mail ~]$ zmcontrol -v
Release 8.8.12_GA_3794.RHEL7_64_20190329045002 RHEL7_64 FOSS edition, Patch 8.8.12_P1 proxy.
[zimbra@mail ~]$

Users -> URL – https://mail.ibtechpa.com
Admin URL – https://mail.ibtechpa.com:7071/


Test success!!!